

Relationship Management Features
The Accounts Receivable and Account Payable have a relation management component that will allow you to attach general memos and contact notes to a customer or vendor. The general memos are accessed using the F11 key. The detailed contact notes are accessed using the F12 key. The customer information can be accessed through either the Accounts Receivable or Sales Order Modules. Vendor information can be accessed through the Accounts Payable module. Recent releases have added the general memo capability to both Inventory items and Payroll employees.
Using the Memo Pad (F11 notes)
Use the key to document and look up permanent notes related to your customers, vendors, employees and inventory items. These permanent notes would normally be things that would be fairly static and you wish to refer back to on a regular basis. Some examples would be e-mail addresses or additional contact names with their position within a company. Some sales reps have even found it useful as a memory aid to remember personal information they gathered about a customer such as a favorite sports team. Essentially anything you wish to keep on file about the customer or vendor that you don’t have a field for in the master set up.
The Memo Pad is also where the e-mail addresses will be kept when you are using the Oneir e-mail features.
Customer Memo Pad
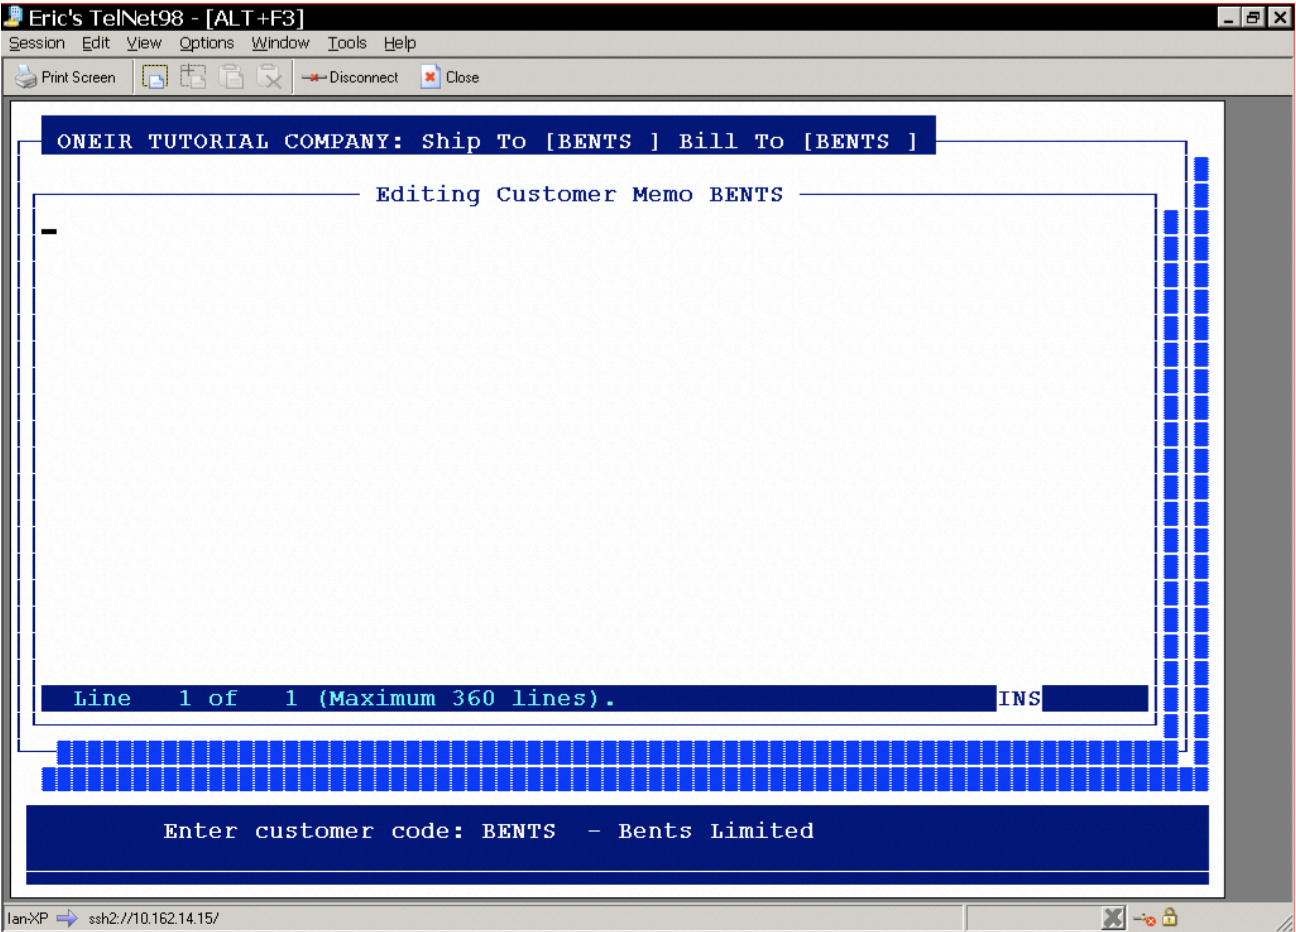
From the Accounts Receivable menu you can access the memo pad from two areas, “Add update or delete customer”, or “Display customer account status”. To create, edit, or view the current memo notes, merely call up the customer code in either screen. Once you have entered the customer code and are presented with the options menu, press the F11 key to open the Memo Pad. If you are in “Display customer account status” you can also choose “Contact/Memo Pad ” from the options menu.
You will be presented with a screen similar to this:
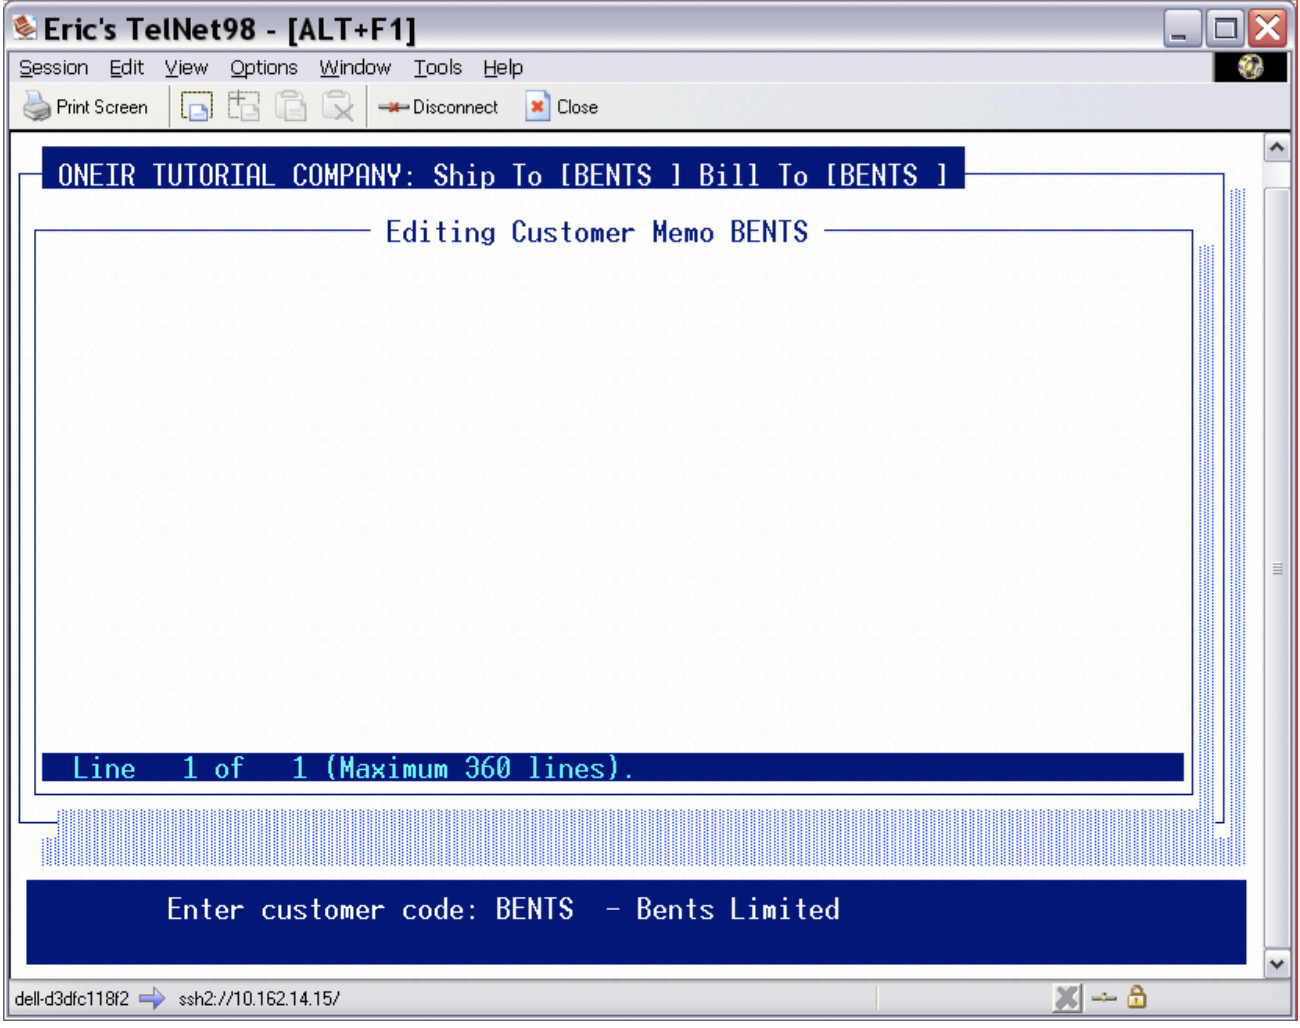
As you can see, this particular customer does not have any memo information attached. To add information merely type the information you desired. If you wish to create multiple lines of information, press to go to the next line. To move around existing information use the arrow keys. To change information move the cursor to the text you wish to change and begin typing. As you type, the old information will be overwritten. If you wish to insert information between characters on an existing line, press the key. You will notice that INS appears on the bottom right of the Memo Pad window.
If you are using Windows workstations, and are familiar with copy and paste functions, you may also paste information in to the memo from the Windows environment.
If you are using the Eric’s TelNet program to access Oneir, you may also select text to copy out of the Memo Pad (or anywhere else for that matter) and then paste it in to a Windows program. To select the text to copy:
1. Click ‘Edit’ on the Eric’s TelNet menu bar. (The line above that has ‘Session’, ‘Edit’, ‘View’ etc.)
2. Choose ‘Select + Copy’.
3. Use your Mouse and position your pointer over the first character in the text you wish to copy. 4. Use you left mouse button to click on that first character. Hold the button down while you drag your mouse over the rest of the characters to copy.
5. Once the entire text you wish to copy is highlighted, release the mouse button. The text is now on the Windows Clipboard. Open the Windows program you wish to paste the text into. Follow the normal procedure to paste text to that particular program.
Please note that this technique can require some practice. It is a little tricky to get the text highlighted. If you let the mouse button go before you have all the text highlighted, it is best to start over. You only have one chance to select the text. (There is an option to ‘Select + Append’ which you may use to add text to what you have selected. However, it is strongly suggested that you get familiar with the standard ‘copy’ option first before graduating to the more advanced ‘append’ option.)
To set up e-mail addresses to work with the Oneir e-mail feature, enter each address on a new line. To identify the line to the programs as an e-mail address, start the line with the text
EMAIL:
Please note that the program does try to include all permutations of the spelling of ‘EMAIL’. So, if you prefer to use ‘e-mail’, ‘Email’ ‘E-MAIL’ or something else, you can. It also tries to capture typing errors such as ‘emial’. However as with anything concerning data entry, it is good to pick one format and try to be consistent with it. It just keeps your data neater and helps if you wish to search the data for all emails. It allows you to search for one consistent string, rather than try to think of every combination yourself.
To identify an e-mail address as a default for a particular form include the form name in brackets, like so:
EMAIL (Confirmation):
EMAIL (Invoice):
EMAIL (Quote):
EMAIL (Statement):
EMAIL (Order Guide):
You may also include the person’s name to further identify that the e-mail address belongs to:
EMAIL (person’s name):
When you are finished with the memo, press . You will then be asked, “Do you wish to save the changes? (Y/N)”. If you wish to discard any changes you made and keep the memo as you originally found it, answer No. If you wish to update the memo with your changes answer Yes.
The Customer Memos can also be accessed from the Sales Order menu from “Prepare Sales Order”, “Prepare Credit Note”, or “Prepare Quote” screens at any point after entering the customer code and before entering the body of the order. (After the ship to code has been entered and before the proceeding to the product code entry screen.)
You may choose to set up a template for your F11 notes. This is a very simple file that can be created in any text editor. (Ex. WordPad, DOS Editor, Note Pad) In the text file include whatever fields you wish to have on your template, however it is presented on your screen as you enter fields is exactly how it will look in Oneir. The file name must be ‘template.rnd’. Be sure that the characters are all lowercase, as Oneir will not be able to find anything else. (ex TEMPLATE.RND or Template.Rnd) Here is a sample template.rnd layout.
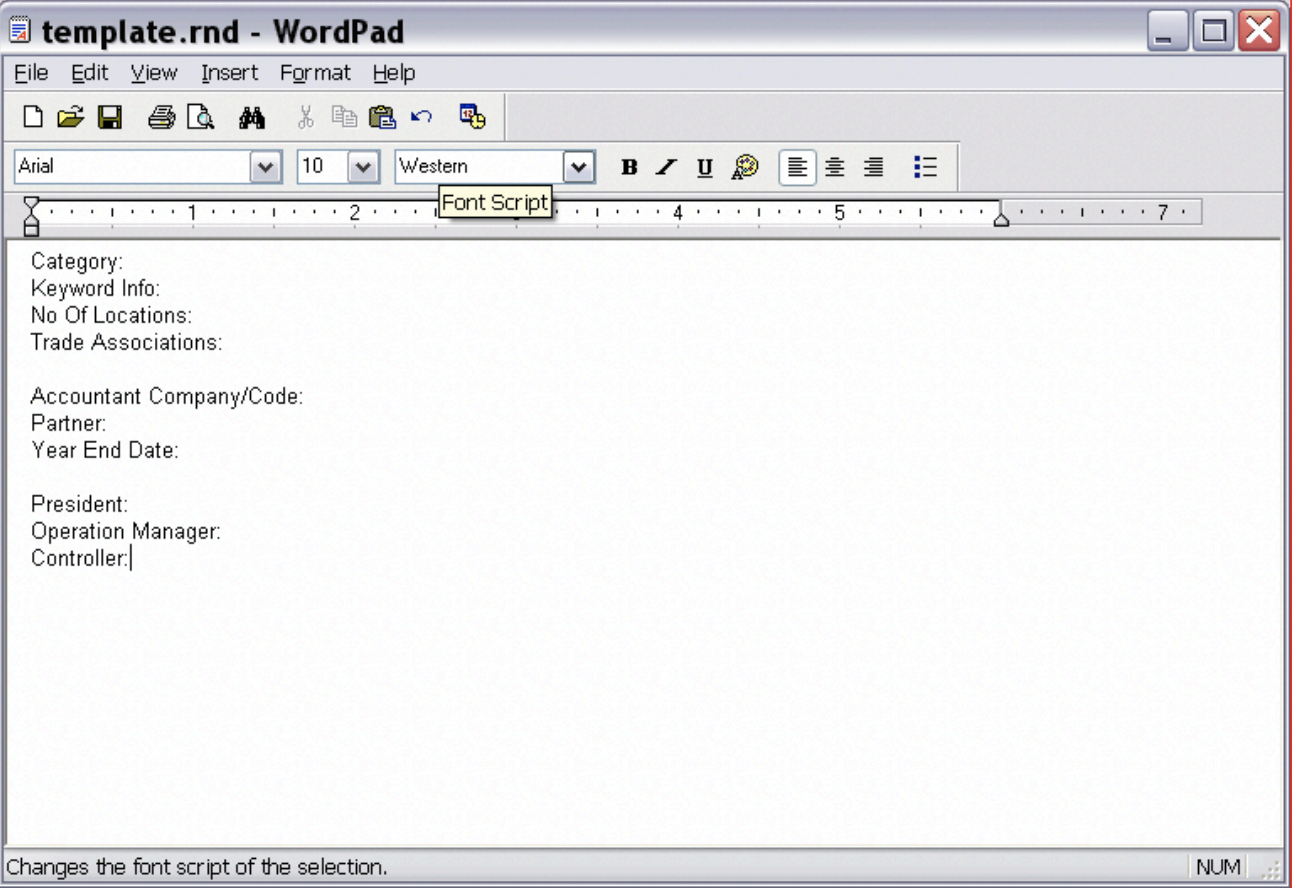
This is merely a sample of fields you may wish to set up there is no set format. You are only limited by your imagination and the 360-line maximum. Remember the template will be the same for every customer and vendor so it should be general enough to be used for both areas.
Once you have your template designed, e-mail it to Oneir support and they can place it on your Linux server for you. Please refer to the FAQ ‘Using WinSCP’ to transfer the file yourself.
The Customer Memo Report
The report for the memo is available through the Accounts Receivable reports menu, “Print the customer memo and client contact reports”. To print the memo report, choose the option “1. Customer Memo report”.
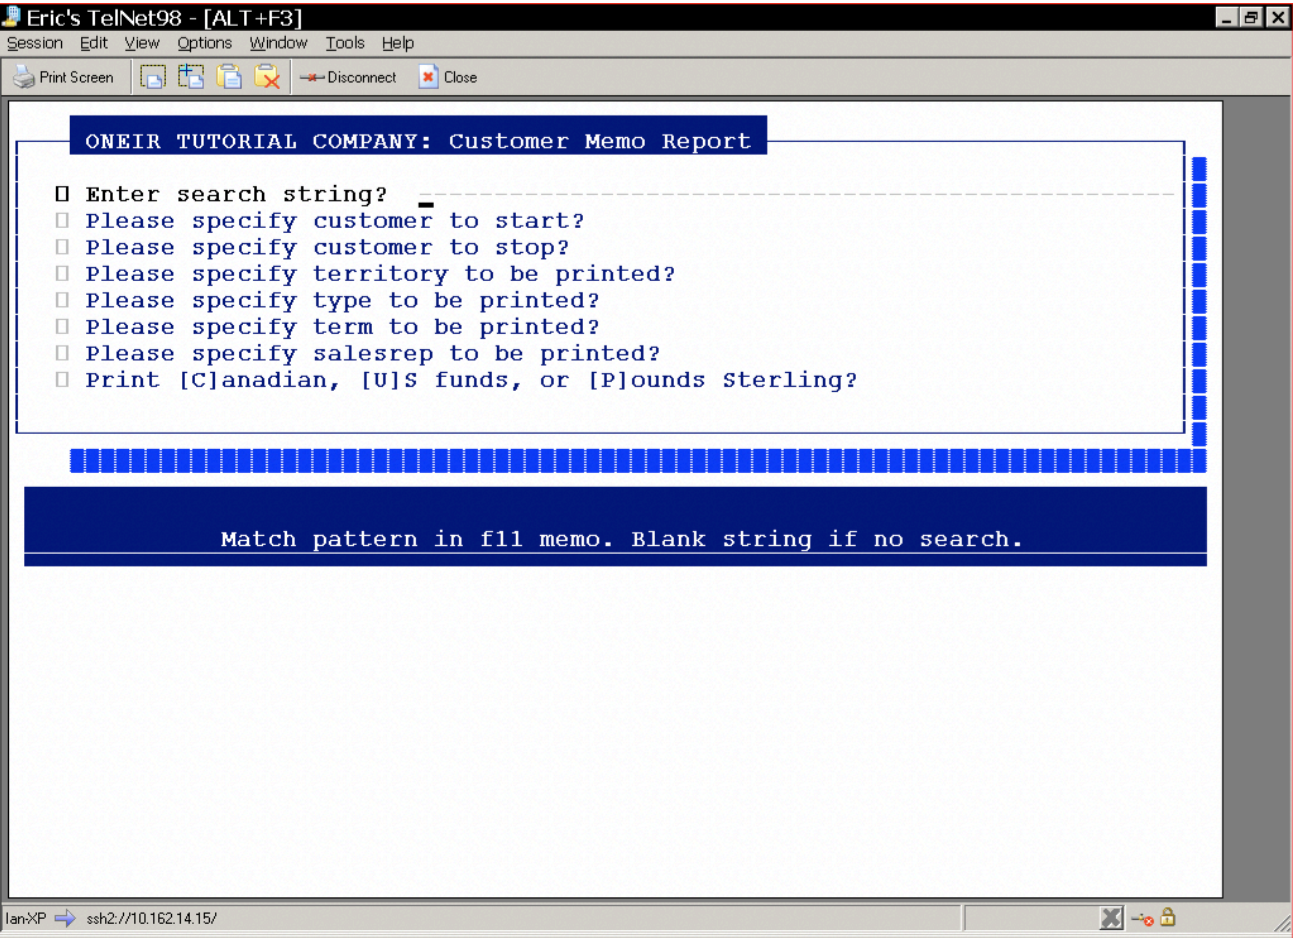
As you can see the report criteria are fairly standard for a customer report.
The one exception is the ‘Enter search string?’ option. This option allows the user to search all the memos and will only include the notes that contain those search words. The search can only find exact matches for the string. I.e. if the search string is E- MAIL, then the search will not find email or e_mail. The search is not case-sensitive, so upper and lower case are not important.
If you enter multiple words in the search, it will try to find the exact match including spaces. Ex. if the search string is “Hours of Operations” it can only find notes that contains an exact match. It will not find all notes with “Hours” “of” and “Operations”.
Special Encrypted Customer Memo Pads
In addition to the Memo Pad, Accounts Receivable customers also have an additional option to save credit card information, but could also be used to save any other sensitive information. Normal memo files are just standard text files, the “Credit Card and Banks’ memo area is 128-bit encryption, or in other words, no other program will be able to decode the information without sophisticated cryptography. Within Oneir these files are password level protected so that only users with a password level 7 and above may access and edit this information. The file is accessed only through ‘Display Customer Account Status’. The overall function is the same as the normal F11 Memo Pad.
If you are using credit card authorization, this is where the credit card numbers will be saved. Users under level 7 will be able to choose saved credit cards or add new credit cards to the list at the time of receiving a payment. The full details on credit card authorization are beyond the scope if this document. Please refer to Credit Card Authorization for those details.
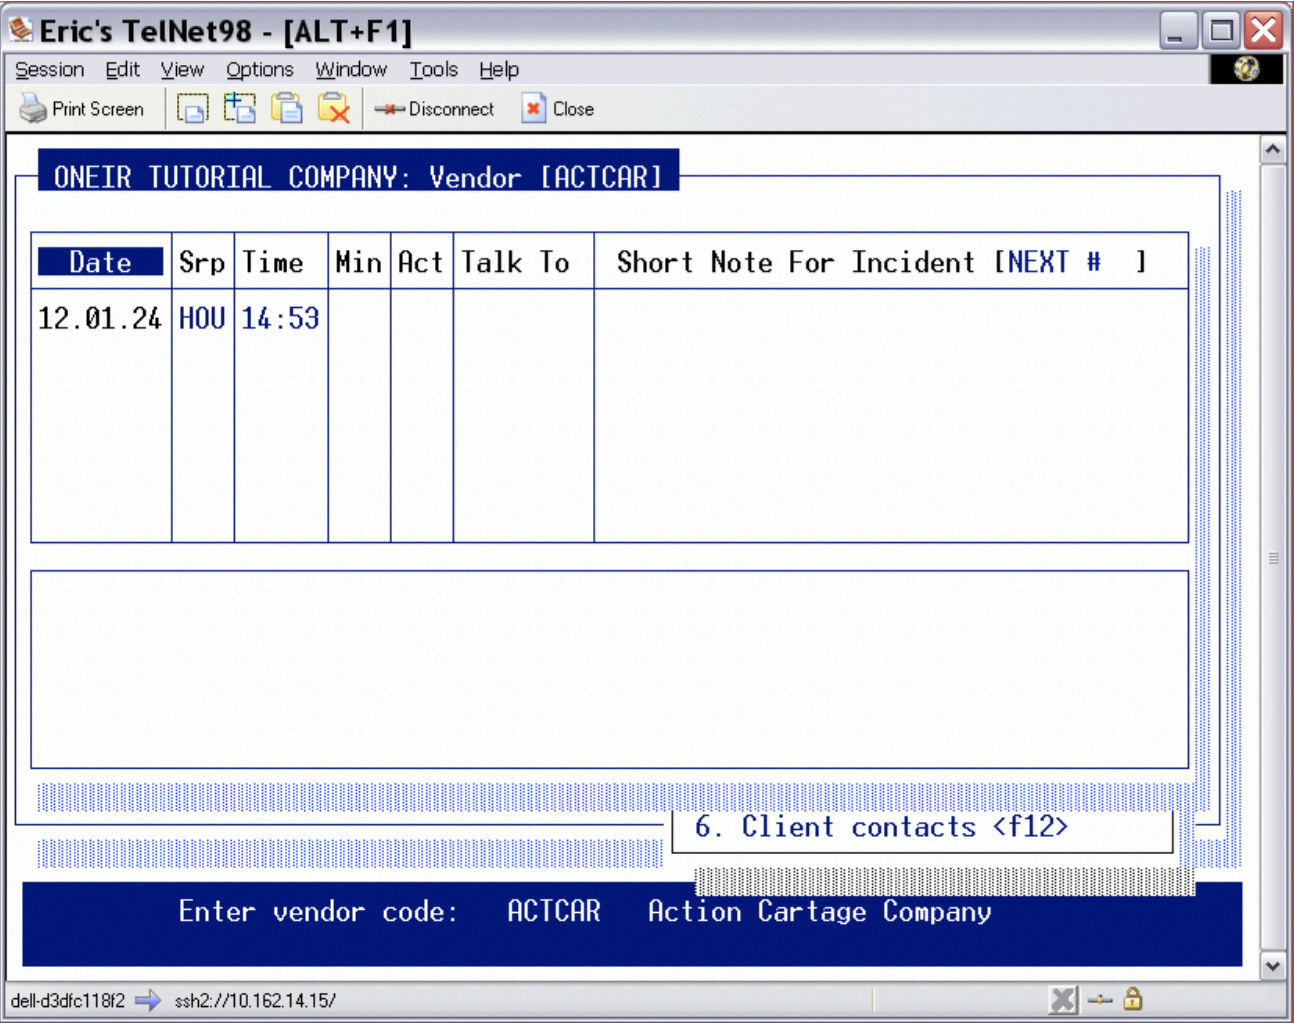
Vendor Memo Pad
From the Accounts Payable menu you can access the memo pad from two areas, “Add update or delete vnedors”, or “Display vendor account status”. To create, edit, or view the current memo notes, merely call up the vendor code in either screen. Once you have entered the vendor code and are presented with the options menu, press the F11 key to open the Memo Pad. If you are in “Display vendor account status” you can also choose “Contact/Memo Pad ” from the options menu.
You will be presented with a screen similar to this:
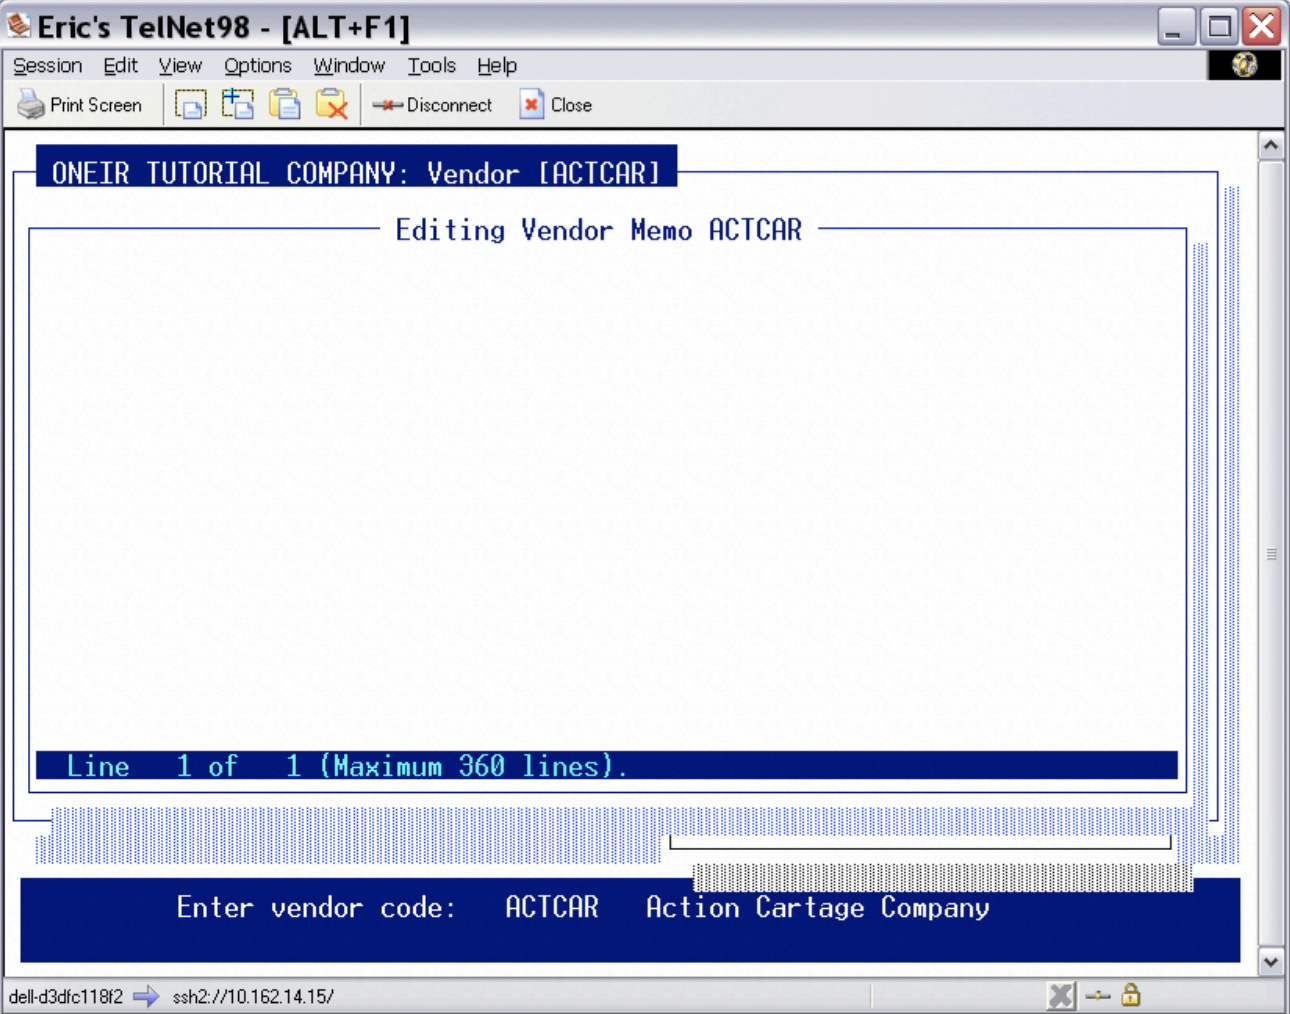
As you can see, this particular vendor does not have any memo information attached. To add information merely type the information you desired. If you wish to create multiple lines of information, press to go to the next line. To move around existing information use the arrow keys. To change information move the cursor to the text you wish to change and begin typing. As you type, the old information will be overwritten. If you wish to insert information between characters on an existing line, press the key. For detailed information on insert and select and copy see the Customer Memo section.
To set up e-mail addresses to work with the Oneir e-mail feature, enter each address on a new line. To identify the line to the programs as an e-mail address, start the line with the text
EMAIL:
Please note that the program does try to include all permutations of the spelling of ‘EMAIL’. So if you prefer to use ‘e-mail’, ‘Email’ ‘E-MAIL’ or something else, you can. It also tries to capture typing errors such as ‘emial’. However as with anything concerning data entry, it is good to pick one format and try to be consistent with it. It just keeps your data neater and helps if you wish to search the data for all emails. It allows you to search for one consistent string, rather than try to think of every combination yourself.
To identify an e-mail address as a default for a particular form include the form name in brackets, like so:
EMAIL (Purchase Order):
You may also include the person’s name to further identify that the e-mail address belongs to:
EMAIL (person’s name):
When you are finished with the memo, press . You will then be asked, “Do you wish to save the changes? (Y/N)”. If you wish to discard any changes you made and keep the memo as you originally found it, answer No. If you wish to update the memo with your changes answer Yes.
The Vendor Memo Report
The report for the vendor memo is available through the Accounts Payable reports menu, “Print the vendor memo and supplier contact reports”. To print the memo report, choose the option “1. Vendor Memo report”.
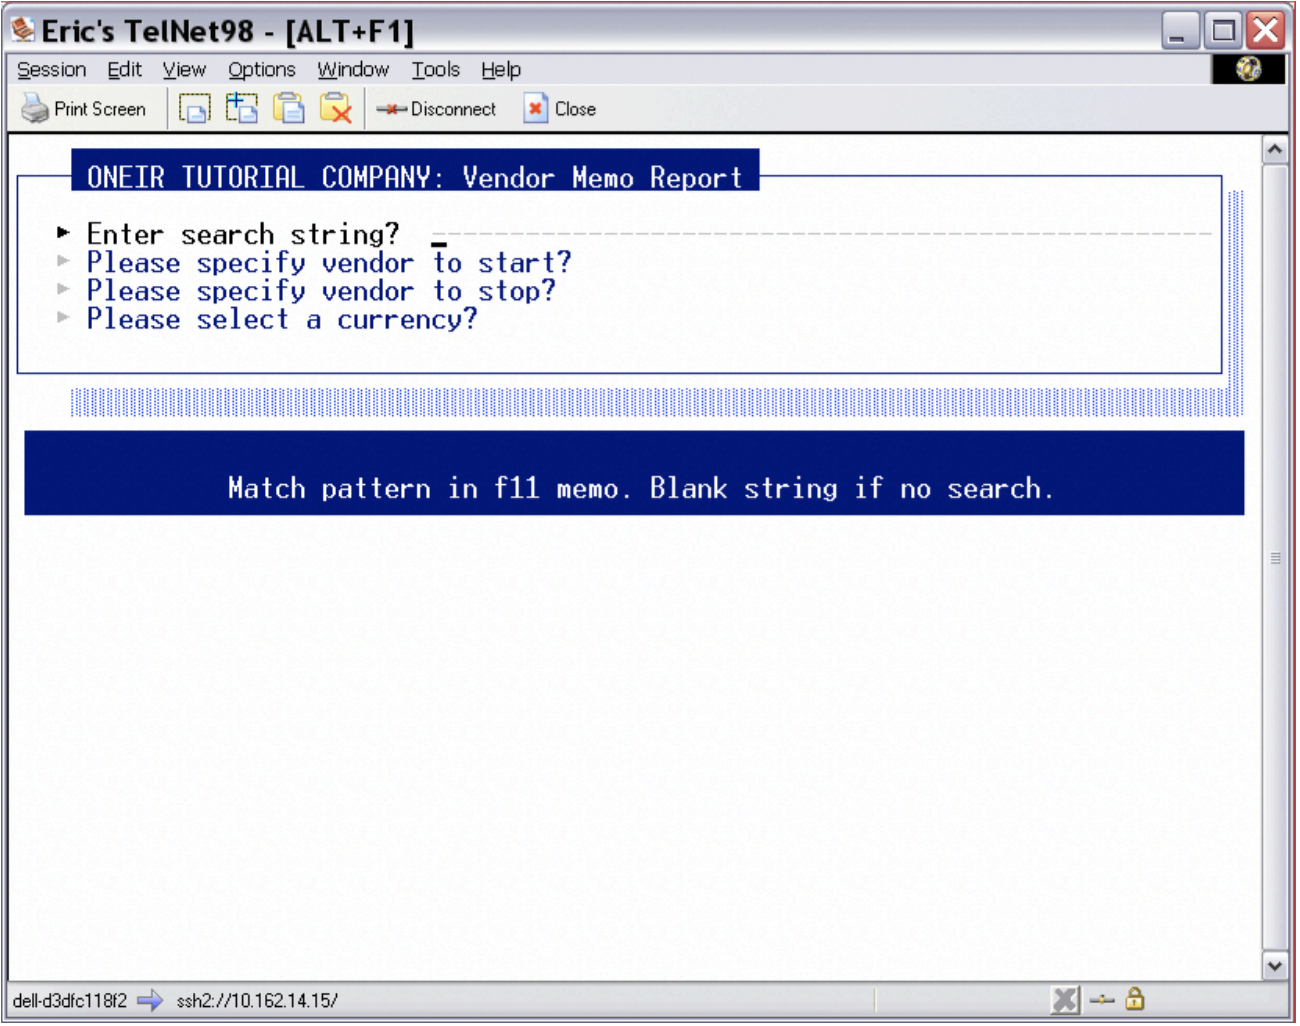
As you can see the report criteria are very similar to a vendor master listing report.
The one unique question is the ‘Enter search string?’ option. This option allows the user to search all the memos and will only include the notes that contain those search words. The search can only find exact matches for the sting. I.e. if the search string is E-MAIL, then the search will not find email or e_mail. The search is not case- sensitive, so upper and lower case are not important.
If you enter multiple words in the search, it will try to find the exact match including spaces. Ex. if the search string is “Hours of Operations” it can only find notes that contains an exact match. It will not find all notes with “Hours” “of” and “Operations”.
Inventory Memo Pad
From the Inventory menu you can access the memo pad from two areas, “Add update or delete inventory items”, or “Display inventory product status”. To create, edit, or view the current memo notes, merely call up the product code in either screen. Once you have entered the product code and are presented with the options menu, press the F11 key to open the Memo Pad. If you are in “Display inventory product status” you can also choose “Memo Pad ” from the options menu.
You will be presented with a screen similar to this:
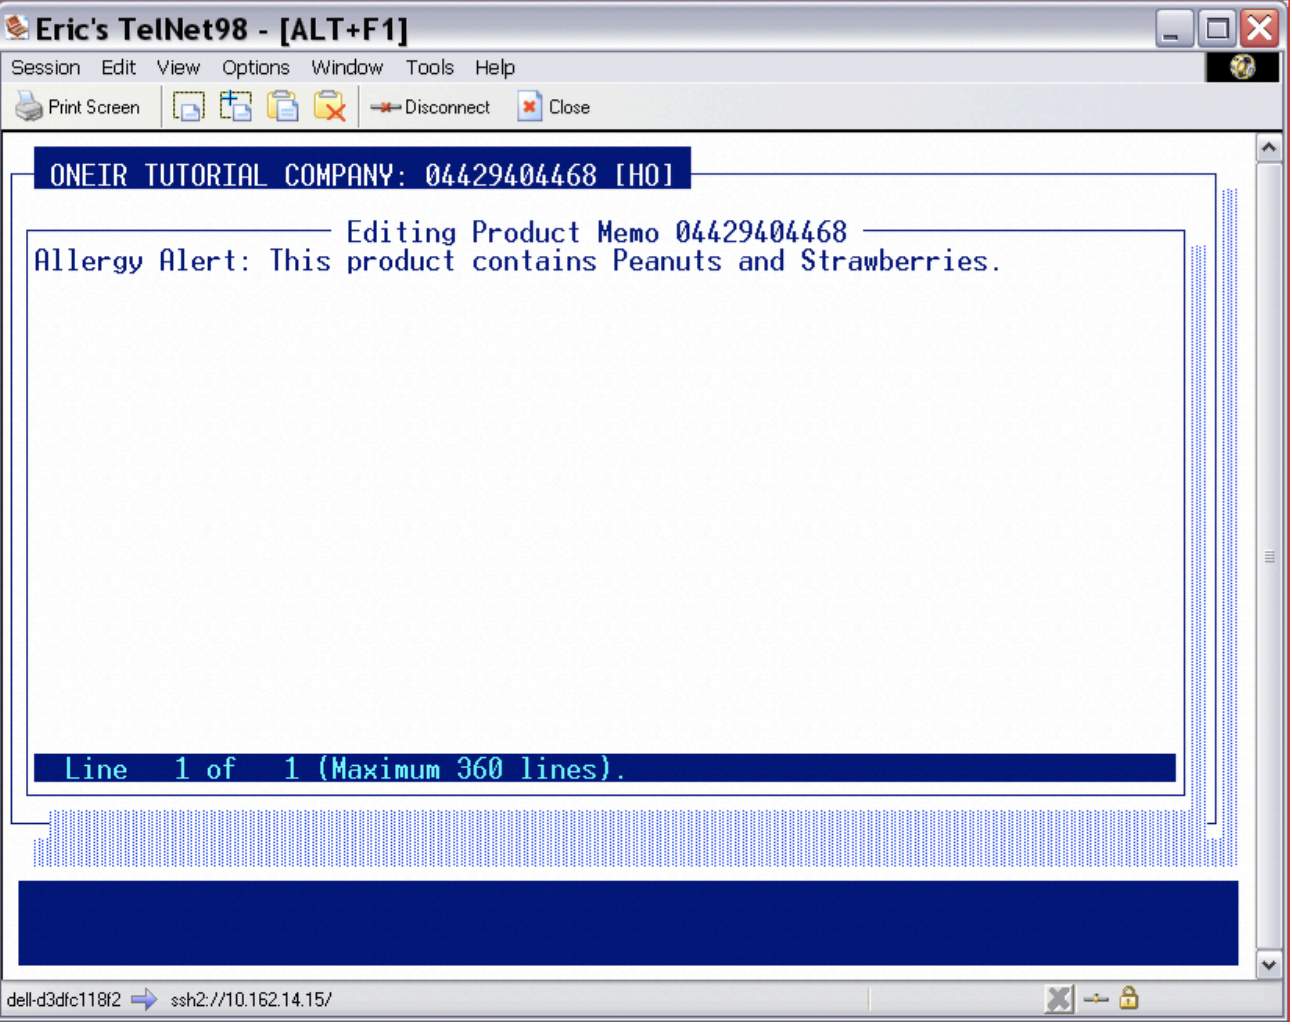
As you can see, this particular product has an allergy alert. To add information merely type the information you desired. If you wish to create multiple lines of information, press to go to the next line. To move around existing information, use the arrow keys. To change information, move the cursor to the text you wish to change and begin typing. As you type, the old information will be overwritten. If you wish to insert information between characters on an existing line, press the key. For detailed information on insert and select and copy see the Customer Memo section.
The Product Memo Report
The report for the inventory product memo is available through the Inventory Management reports menu, “Print the product memo report”.
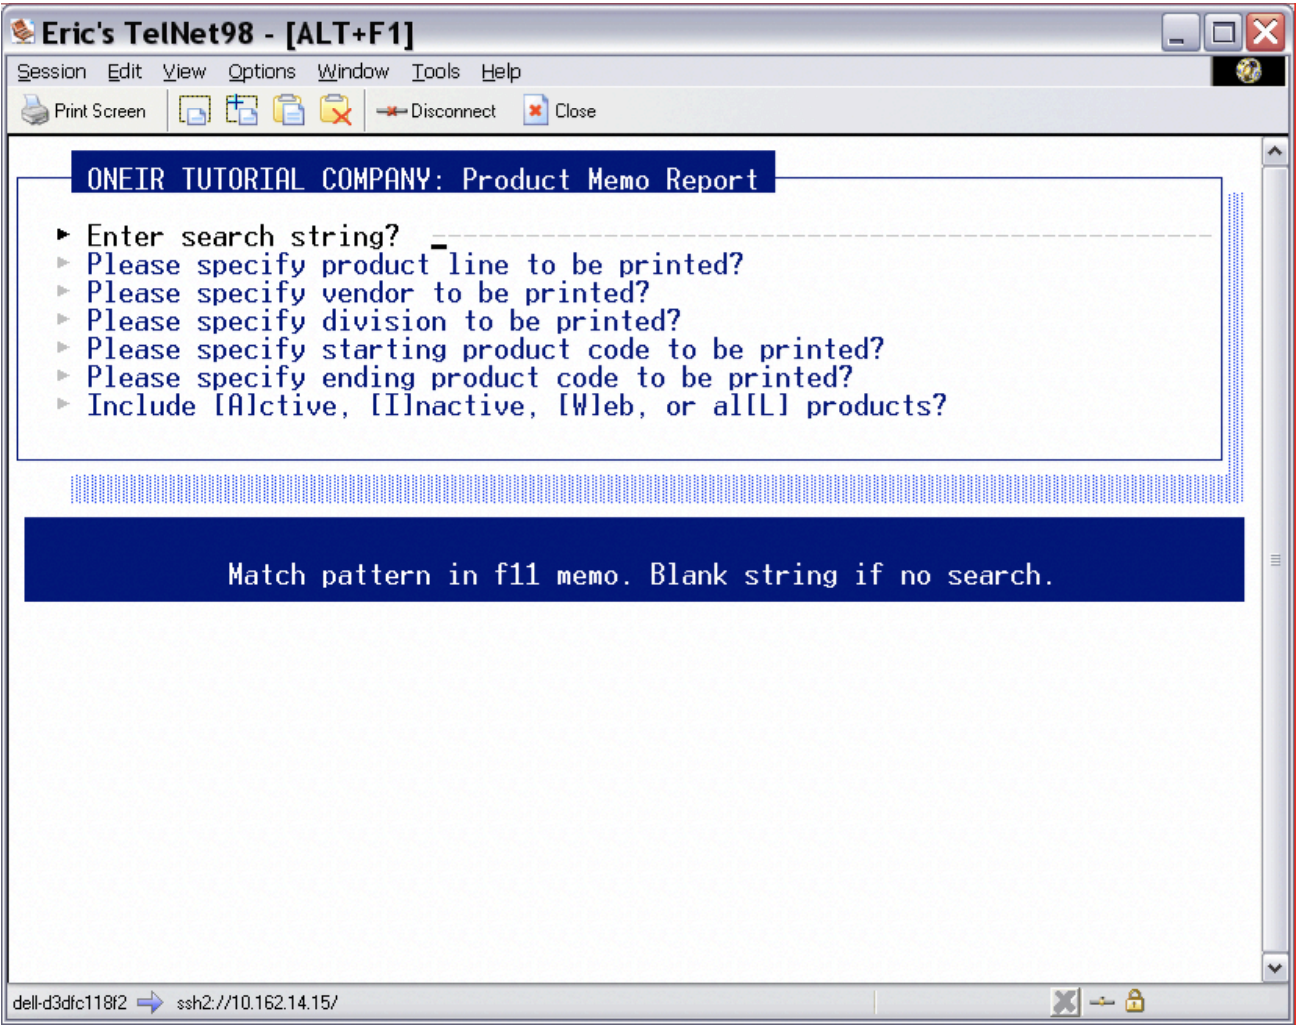
As you can see most of the report criteria are very similar to any other inventory report.
The one unique question is the ‘Enter search string?’ option. This option allows the user to search all the memos and will only include the notes that contain those search words. The search can only find exact matches for the string. I.e. if the search string is ALLERGY, then the search will not find alergy or allerrgy. The search is not case- sensitive, so upper and lower case are not important.
If you enter multiple words in the search, it will try to find the exact match including spaces. Ex. if the search string is “Allergy Alert” it can only find notes that contains an exact match. It will not find all notes with “Allergy” and “Alert”.
Employee Memo Pad
From the Payroll menu you can access the memo pad from “Add update or delete employees” from the Employee menu. To create, edit, or view the current memo notes, merely call up the employee code in that screen. Once you have entered the customer code and are presented with the options menu, press the F11 key to open the Memo Pad, or you can also choose “Contacts/Memo Pad ” from the options menu.
You will be presented with a screen similar to this:
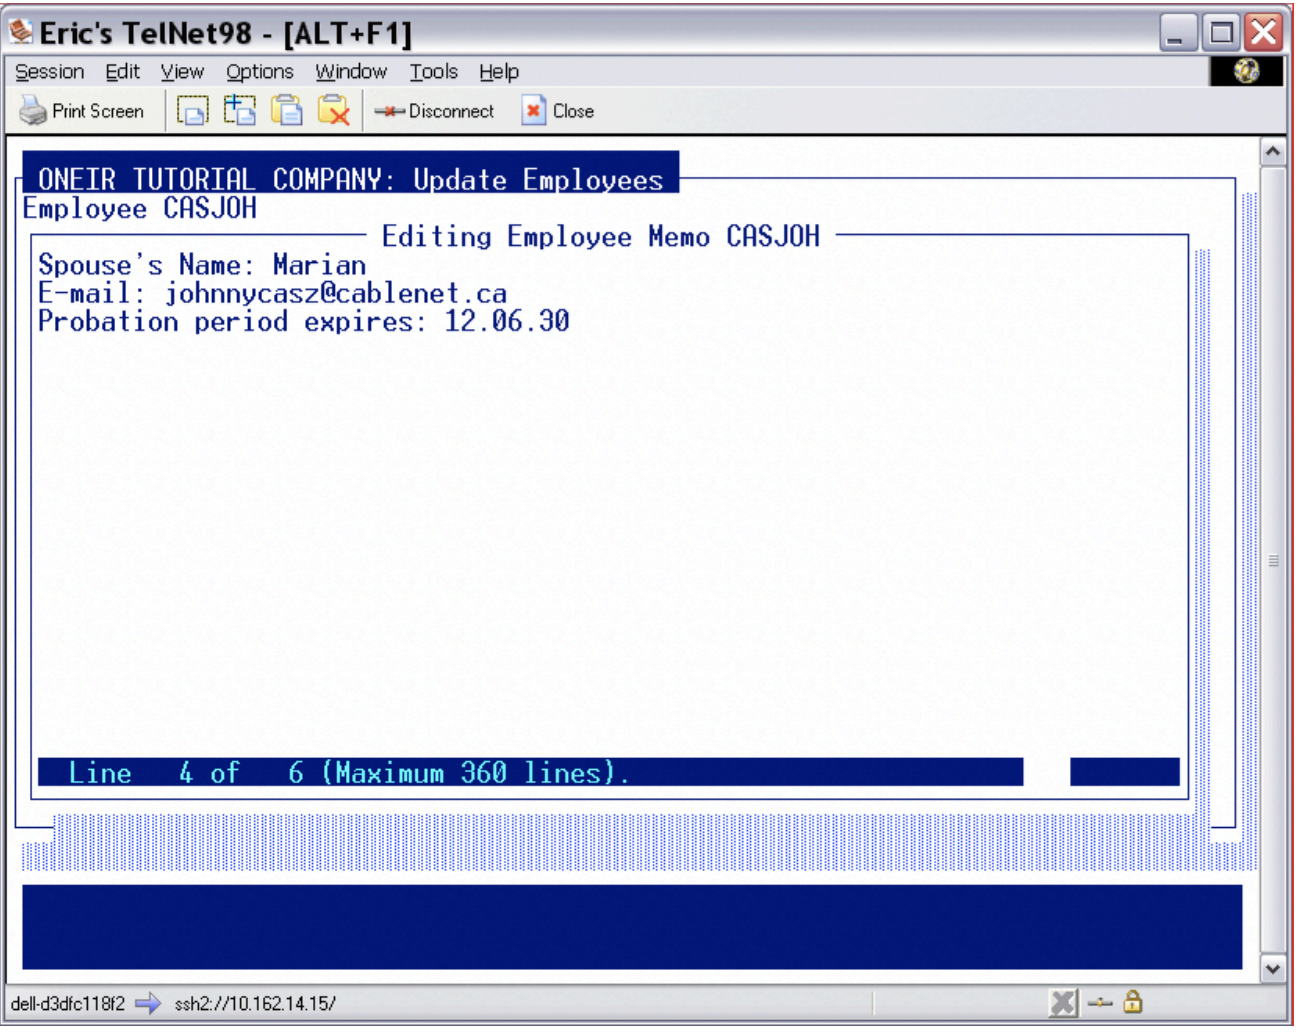
As you can see, this particular employee has some memo information attached. To add information merely type the information you desired. If you wish to create multiple lines of information, press to go to the next line. To move around existing information use the arrow keys. To change information move the cursor to the text you wish to change and begin typing. As you type, the old information will be overwritten. If you wish to insert information between characters on an existing line, press the key. For detailed information on insert and select and copy see the Customer Memo section.
The Employee Memo Report
The report for the employee memo is available through the Payroll reports menu, “Print the employee memo report”.

As you can see most of the report criteria are very similar to the employee master listing.
The one unique question is the ‘Enter search string?’ option. This option allows the user to search all the memos and will only include the notes that contain those search words. The search can only find exact matches for the string. I.e. if the search string is E-MAIL, then the search will not find email or e_mail. The search is not case- sensitive, so upper and lower case are not important.
If you enter multiple words in the search, it will try to find the exact match including spaces. Ex. if the search string is “Spouse’s Name” it can only find notes that contains an exact match. It will not find all notes with “Spouse’s” and “name”.
Using the Contact Management Notes
Customer Contact Management Notes
Use the key to document discussions, follow-ups and other notations related to your customers. This option gives you a chronological detail of your dealings with customers. Some examples of the uses for these contact notes are:
– Logging Accounts Receivable calls.
– Keeping track of customer relations issue resolutions.
– Logging the tracking number and date for shipments.
– Logging reminders for Sales Representatives for follow up calls.
Of course, you are not limited to just these scenarios. The notes can be used for anything that you wish to track that happens with a customer.
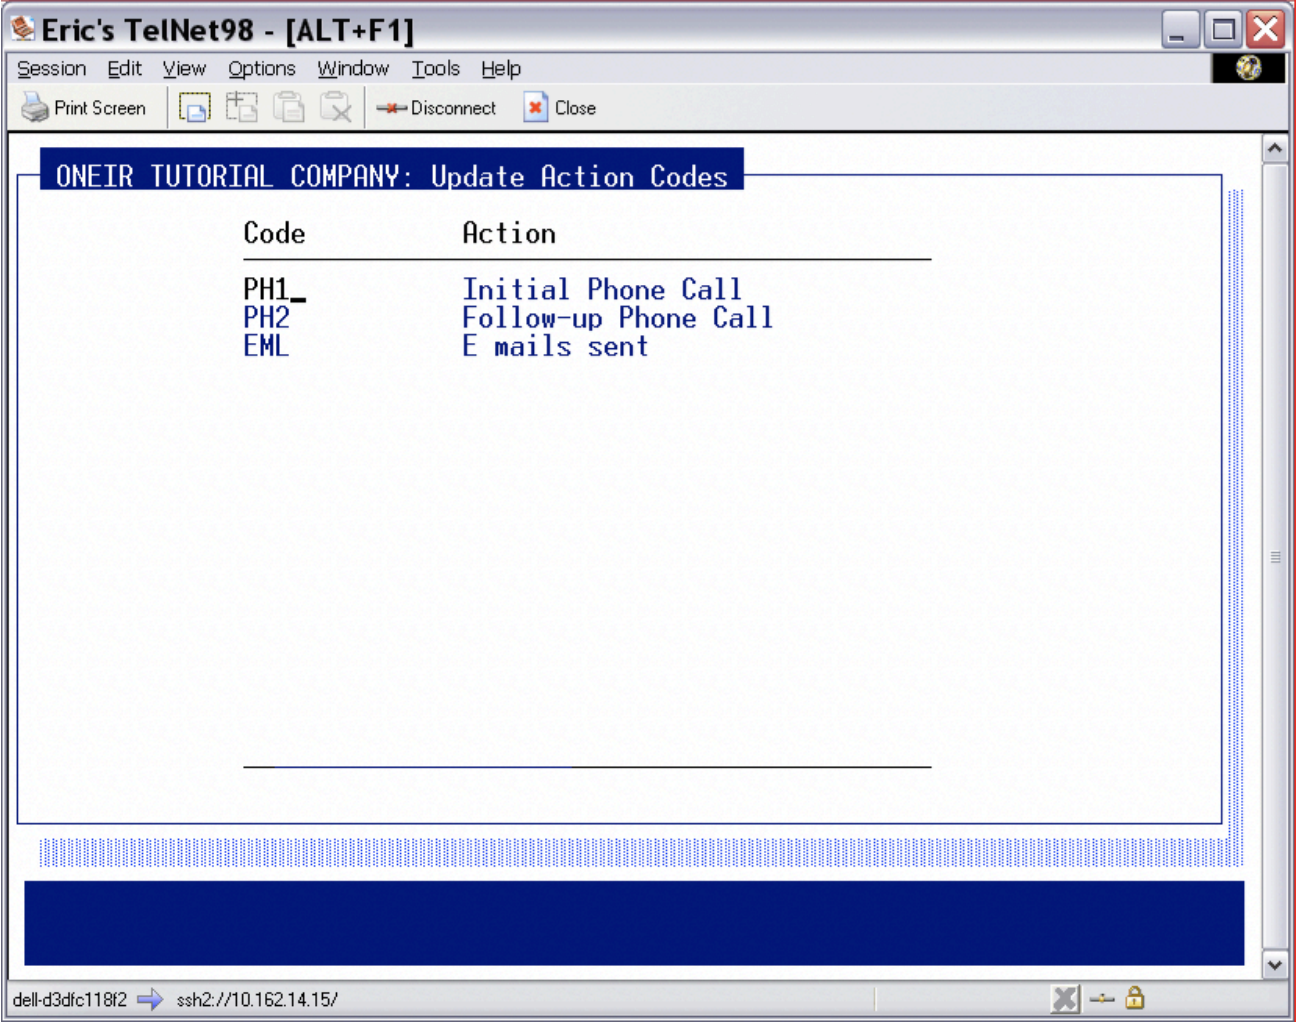
To help define the type of conversations and to help with sorting and searching the notes, you may set up ‘Contact Action Codes’. These action codes, when well thought out, will help any user know what the note was about without having to read the entire note. It also helps with reporting or searching the notes as it allows the user to narrow in on exactly what type of note they need, essentially filtering out the notes on subjects that have nothing to do with what they are interested in.
You may use the contact management notes after you add just one Contact Action Code. However, to get the full use of the notes, take a few minutes and plan out what you will be using the notes for, and what categories make sense to create for your company.
Much like inventory product lines, action codes should have some logic and thought put in to the end goal. Ask yourself these questions:
1. What are the codes going to be used for? (ex. Receivables collection, Issue resolution, Sales follow ups, etc. in other words different actions that you would want to separate from each other.)
2. What is a reasonable division of actions? Too many codes and you just end up with a cluttered mass where it will be too confusing for other to use. If people are confused by a system, they will either not use it, or make their own rules and there will be no consistency in the notes. Hence defeating the purpose of setting up the action codes.
3. Are their multiple stages to some actions? (Example, on accounts receivable calls, perhaps you want different actions for first call, last call and written off/sent to collections. But again, don’t get to wrapped up in creating an action for every possibility, as stated in question 2; you can make it too complicated.
4. You have only three characters for each code. So try to come up with codes that will group similar actions together, especially if you decide to have multiple stages to some actions. (ex. Maybe AR call will all start with A, or sales action all start with S.) This will allow you to search and print reports using the wild card ‘?’ to get all related actions. Using the example of all sales actions staring with S, you could then print a report for all sales actions by asking for the action code S??.
(A note about the wild card ‘?’: The question mark should not be set up in the code. It is a wild card for reporting, where ‘?’ represents every possible character. By adding the symbol to a code itself is defeating the purpose of the wild card. This goes for any code set up within Oneir where a wild card is available. I.e. action codes, product lines and divisions/profit centers just to name a few.)
Once you have decided what your action codes will be, define them within the company:
1. Setting up Action Codes
2. Go to the Accounts Receivable Menu
3. Select ‘Set up terms, types, sales reps, contact action codes’
4. Choose ‘ Set up contact action codes’.
5. Enter your action codes and a description for each.
Once you have the action codes defined, you may start using the contact management notes. The order of the codes on the set up screen is the order that they will be displayed when scrolling through while entering notes. If you wish to insert a line, place the cursor on the line where you wish to place the new code and press . This inserts a blank line where you may enter the new code. To delete a line, use .
There are some special options you may set up to interface with the Oneir e-mail feature.
– Adding the phrase ‘/E’ to the end on the action code name will allow you to e- mail the F12 note to other users directly from the note entry screens.
– When you exit you may define one action code to record a note when an e-mail is sent to a customer. Once this is defined, anytime you e-mail a form a note will be automatically created in the F12 with this action code with the date, time, user, what form was e-mailed and to what address.
Creating a Contact Management Note
Notes can be made for customers from the following screens:
– Add update delete customers (Accounts Receivable)
– Display customer account status (Accounts Receivable)
– Prepare Sales Orders / Prepare Credit Notes (Sales Order and Invoicing)
– Add update delete contracts (Repetitive Billing)
In any of these screens, to access the contact management notes, enter the customer code and press F12.
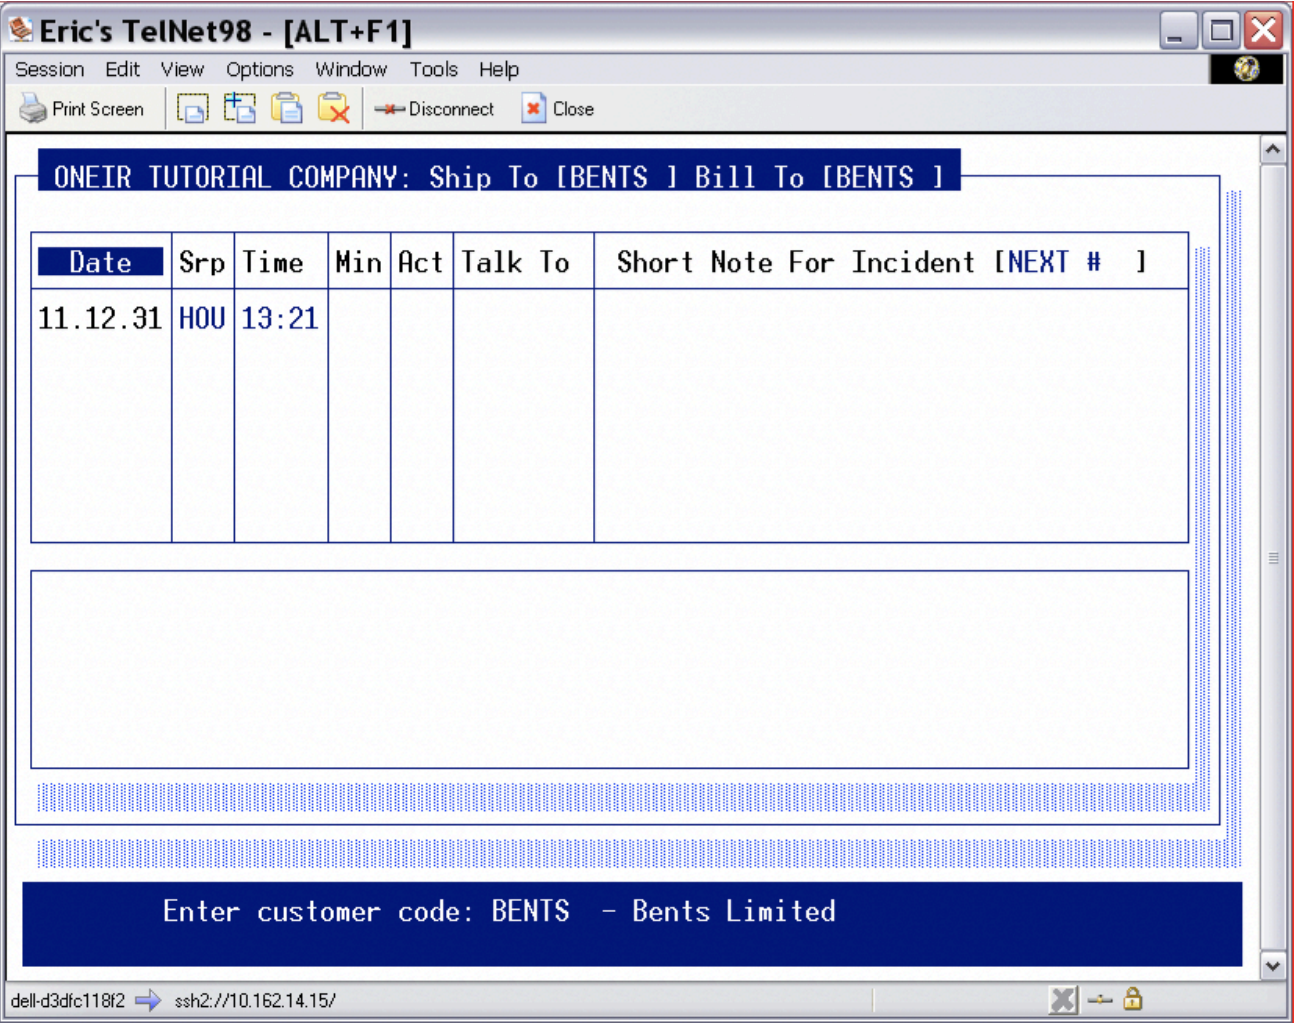
The default date sales rep and time will be automatically filed in based on the accounting date, the user that is logged in to the company, and the computer clock. When creating a new note only the date can be modified. No one may make a note under another person’s sales rep code.
The ‘Min’ field is to record the duration in minutes of the conversation. The minimum duration is 2 minutes. Any time entered less than 2 minutes will automatically be changed to 2 minutes. The maximum duration is 640 minutes (10 hours 40 min) any time entered larger than 640 minutes will automatically be changed to 640 minutes.
The ‘Act’ field is for the Action Code. There must be an Action Code entered for every note. The user may use F3 and F4 to scroll through the existing codes.
The ‘Talk To’ field is intended to identify whom the user talked. This is especially important when entering notes for companies.
Each note will be assigned an incident number, which is a sequential number beginning with 1 and going up to 999999. (When 1 million entries are reach the incident number will roll over back to 1) This starting number is the system default. If you wish to change this number you may request a new starting number. This number is used exclusively by the contact management system to separate one note or group of notes from another.
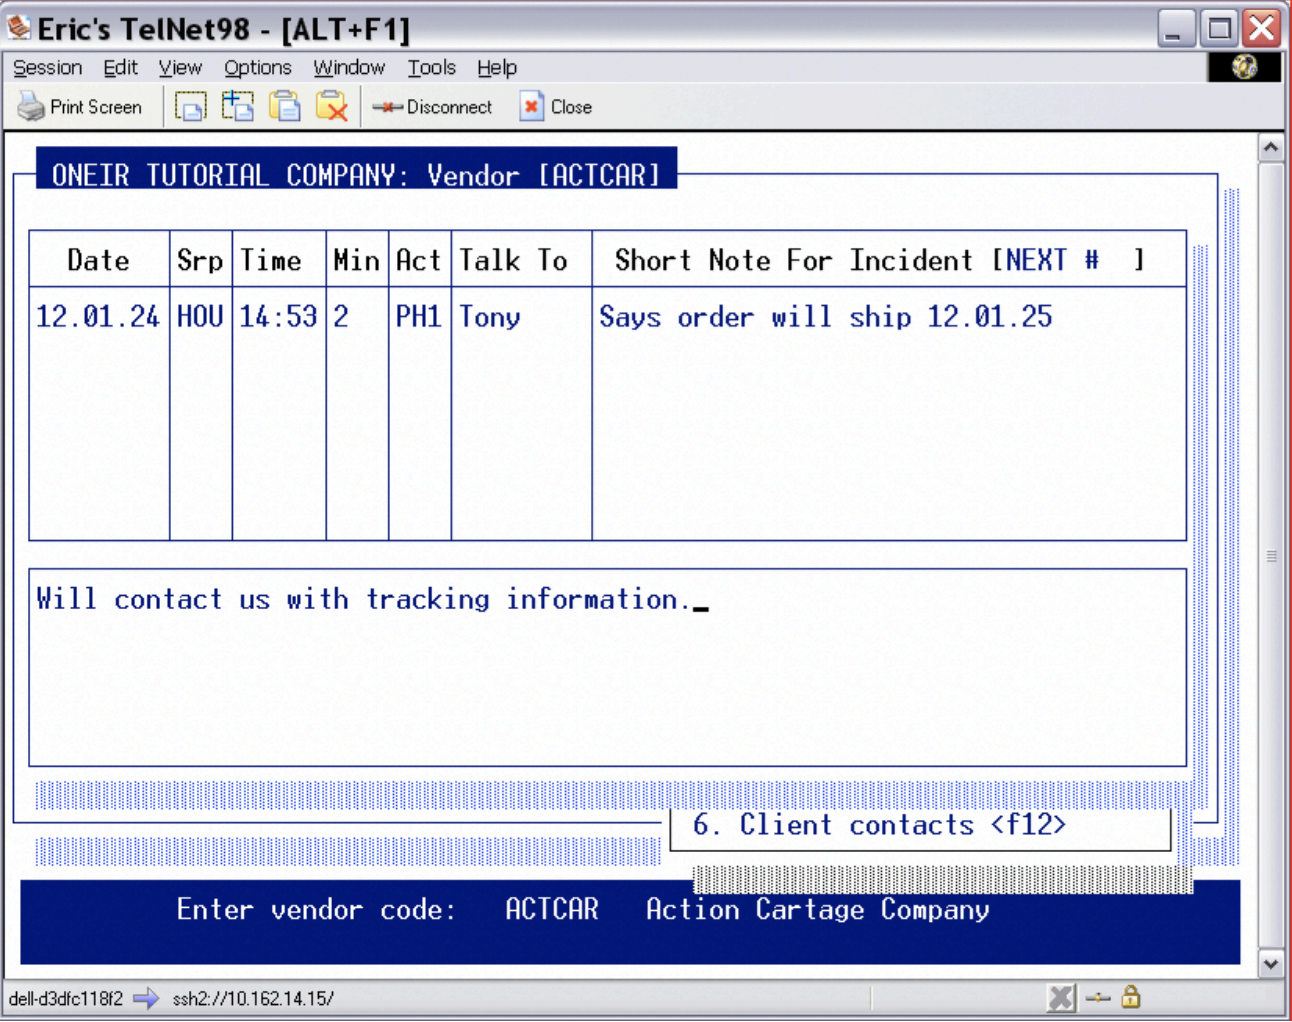
The short note is the first line of any note. It can be used to give a general description of the contents of the note, or just used as the start of the note, or on some occasions it may be the entirety of the note. There are 37 characters available in the short note. To get to the detail note, merely press the key.
The detail note area is the entire bottom half of the entry screen. There are six lines visible on screen, but you may continue entering lines of notes up to 360 lines. Each line may have up to 73 characters.
So that gives you a total of 26317 characters to describe each contact with the customer or vendor. This should be more than enough to say anything you want about even a ten-hour conversation, but if it is not, you may always attach a new note to the original incident note later. Whenever you have exhausted what you wish to say about the conversation, press and save the changes.
Attaching a New Note to an Existing Contact Incident Number
To attach a note to an existing incident number (or modify the note) merely bring up the F12 note screen, and use the up arrow key to bring the cursor to the note/incident you wish to attach/modify.
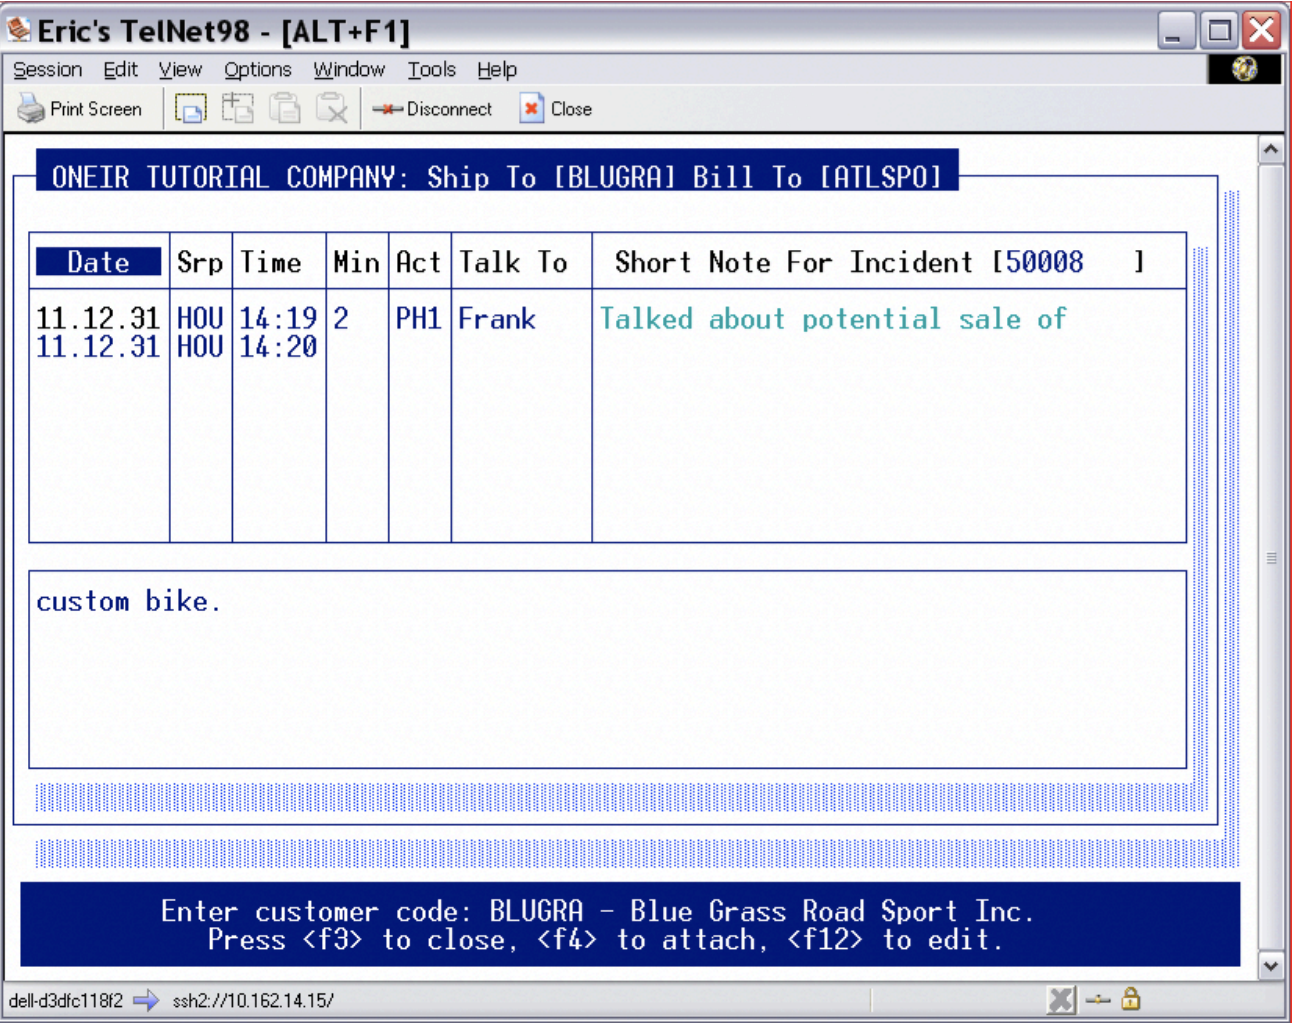
As the note at the bottom of the screen says, press to attach a note to the incident number, or to edit the note.
Changing the Status of a Notes
The ‘close/open’ incident option allows you to mark an incident as finished (closed) or unfinished (open). Closed notes are presented in red. Open Incidents are presented in green. The open and closed status is also used for reporting. Use the F3 key to toggle a note closed or open.
Using Follow-Up Reminders
To use the notes for follow up reminders decide on a date format (i.e. YYMMDD or DDMMYY etc.) to use and enter that format in the text on the note. At the start of each day print a report with the search string of that date, in the agreed upon format, and it will print all notes that have that date.
E-mailing the Note
Record a note using an action code that has the /E flag. When you save the note, it will ask what user email address to send it to.
Searching the F12 notes
If you wish to search the notes without printing the report, you may do so in the Display customer screen. To access the search, press before entering a vendor code. You will be asked for your search string. Enter what you wish to search for. You will then be asked for the action code(s) to include in the search. Use ‘???’ to include all action codes. It will then search ALL notes for the customers or vendors and then present them on screen. You may use your key and key to maneuver the cursor to read the various notes.
When you are done with search results press to return to the display vendor screen.
The Customer Contact Management Report
This is a much more in depth report than the Memo report.
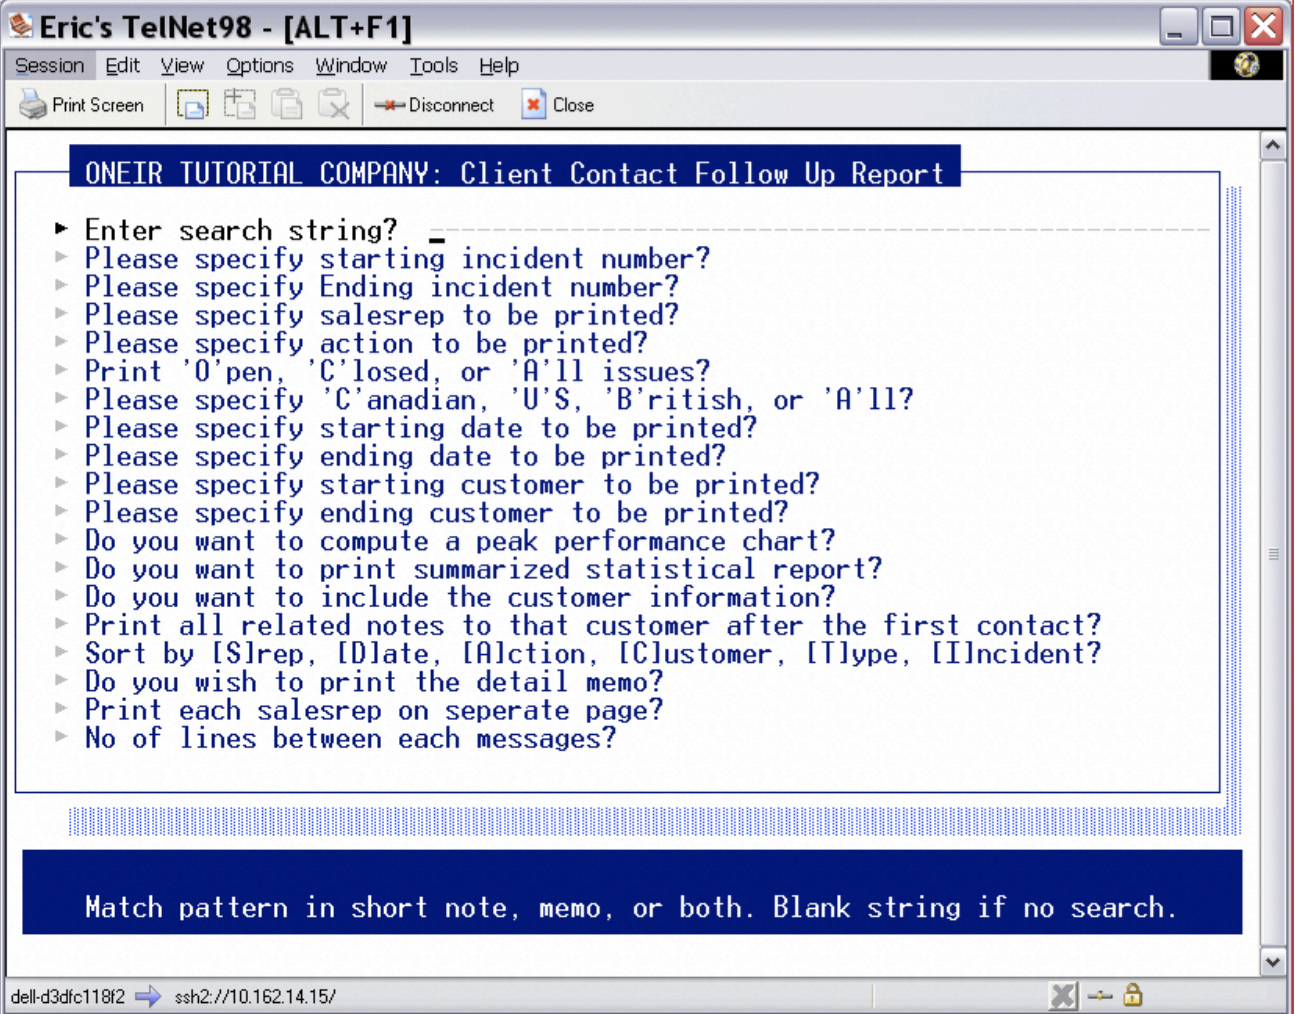
As you can see there are many more options than the F11 contact memo report.
The search string option allows the user to print the report for only items that contain the search string.
You may choose to only print for a certain range of incident numbers. The default will include all incidents numbers.
You may choose to print for one or all sales rep codes.
You may choose to print for one or all action codes or use the wild card ‘?’ to print for a group of action codes.
You may include Open notes, closed notes or both by choosing all.
You may choose a date range for the report. The default is the current calendar month.
You may choose a range of customers; the default will always be the first to last customer.
The peak performance chart is a special report format. It is two reports in one. The first part is a break down of every 15 minutes 8:00 am to 7:00pm with the number of calls in that time period. Each call is represented by a single ‘*’. The second part is a representation of how many minutes were spent on the calls using the same breakdown. The minutes are placed in the fifteen-minute period that the note is recorded in, regardless of the number of minutes the call is logged as. (So, there may be more than fifteen minutes reported in a fifteen minute period. Each ‘*‘in this part of the report represents 7 minutes. This is a special report, so it is always defaulted to no.
A summarized statistical report is another special report. This report will print each customer/vendor that has a note within the reporting range and show the number of notes along with the total number of minutes spent with that customer or vendor. Again, the default answer to this option is no.
If you wish to include the customer or vendor code and name on the report, leave the answer as ‘yes’. If you wish to exclude that information and only see, the date, sales rep, action and the notes, then change the answer to no.
The question “Print all related notes to that customer after the first contact?” gives the user the option to print the notes after the first one that matches the search criteria. This is especially useful when an incident has multiple notes so the entire history can be reported on at once. However a normal report will no include all this extra information, so the default is no.
The sorting options are quite straightforward, if you wish to sort the report by one of the options enter the letter corresponding to the option. The default answer is S and will sort by sales rep.
If you only wish to see the short notes, answer ‘No’ to “Do you wish to print the detail memo?” If you wish to include the detail portion of the note, leave the default at Yes.
The last two questions pertain to the presentation of the report. If you are sorting by sales rep, you may print each rep on a separate page. This means even if a sales rep only has one note it will print on a separate page. This is useful if the report is being distributed to multiple sales reps. The number of lines between notes allows you to put more blank space between the notes on the report. If you do not skip any lines between the notes the report automatically put one line between each entry.
Vendor Contact Management Notes
Use the key to document discussions, follow-ups and other notations related to your vendors. This option gives you a chronological detail of your dealings with vendors. Some examples of the uses for these contact notes are:
– Logging pricing quote calls.
– Logging estimated delivery dates from vendors.
– Keeping track of repair/exchange issue resolutions.
– Logging the tracking number and date for expected shipments.
– Logging reminders for follow up calls.
Of course, you are not limited to just these scenarios. The notes can be used for anything that you wish to track that happens with a vendor.
To help define the type of conversations and to help with sorting and searching the notes, you may set up ‘Contact Action Codes’. These action codes, when well thought out, will help any user know what the note was about without having to read the entire note. It also helps with reporting or searching the notes as it allows the user to narrow in on exactly what type of note they need, essentially filtering out the notes on subjects that have nothing to do with what they are interested in. Please see the Customer section for setting up the Action Codes.
Vendor notes can be made from the following screens in Accounts Payable:
– Add update delete vendors
– Display vendor account status.
In any of these screens, to access the contact management notes, enter the vendor code and press F12.
The default date sales rep and time will be automatically filed in based on the accounting date, the user that is logged in to the company, and the computer clock. When creating a new note only the date can be modified. No one may make a note under another person’s sales rep code.
The ‘Min’ field is to record the duration in minutes of the conversation. The minimum duration is 2 minutes. Any time entered less than 2 minutes will automatically be changed to 2 minutes. The maximum duration is 640 minutes (10 hours 40 min) any time entered larger than 640 minutes will automatically be changed to 640 minutes.
The ‘Act’ field is for the Action Code. There must be an Action Code entered for every note. The user may use F3 and F4 to scroll through the existing codes.
The ‘Talk To’ field is intended to identify whom the user talked. This is especially important when entering notes for companies.
Each note will be assigned an incident number, which is a sequential number beginning with 1 and going up to 999999. (When 1 million entries are reach the incident number will roll over back to 1) This starting number is the system default. If you wish to change this number you may request a new starting number. This number is used exclusively by the contact management system to separate one note or group of notes from another.
The short note is the first line of any note. It can be used to give a general description of the contents of the note, or just used as the start of the note, or on some occasions it may be the entirety of the note. There are 37 characters available in the short note. To get to the detail note, merely press the key.
The detail note area is the entire bottom half of the entry screen. There are six lines visible on screen, but you may continue entering lines of notes up to 360 lines. Each line may have up to 73 characters.
So that gives you a total of 26317 characters to describe each contact with the customer or vendor. This should be more than enough to say anything you want about even a ten-hour conversation, but if it is not, you may always attach a new note to the original incident note later. Whenever you have exhausted what you wish to say about the conversation, press and save the changes.
Attaching a New Note to an Existing Contact Incident Number
To attach a note to an existing incident number (or modify the note) merely bring up the F12 note screen, and use the up arrow key to bring the cursor to the note/incident you wish to attach/modify.
As the note at the bottom of the screen says, press to attach a note to the incident number, or to edit the note.
Changing the Status of a Notes
The ‘close/open’ incident option allows you to mark an incident as finished (closed) or unfinished (open). Closed notes are presented in red. Open Incidents are presented in green. The open and closed status is also used for reporting. Use the F3 key to toggle a note closed or open.
Using Follow-Up Reminders
To use the notes for follow up reminders decide on a date format (i.e. YYMMDD or DDMMYY etc) to use and enter that format in the text on the note. At the start of each day print a report with the search string of that date, in the agreed upon format, and it will print all notes that have that date.
E-mailing the Note
Record a note using an action code that has the /E flag. When you save the note it will ask what user email address to send it to. Searching the F12 notes If you wish to search the notes without printing the report, you may do so in the Display vendor screen. To access the search, press before entering a vendor code. You will be asked for your search string. Enter what you wish to search for. You will then be asked for the action code(s) to include in the search. Use ‘???’ to include all action codes. It will then search ALL notes for the customers or vendors and then present them on screen. You may use your key and key to maneuver the cursor to read the various notes.
When you are done with search results press to return to the display vendor screen.
The Vendor Contact Management Report
This is a much more in depth report than the Memo report.
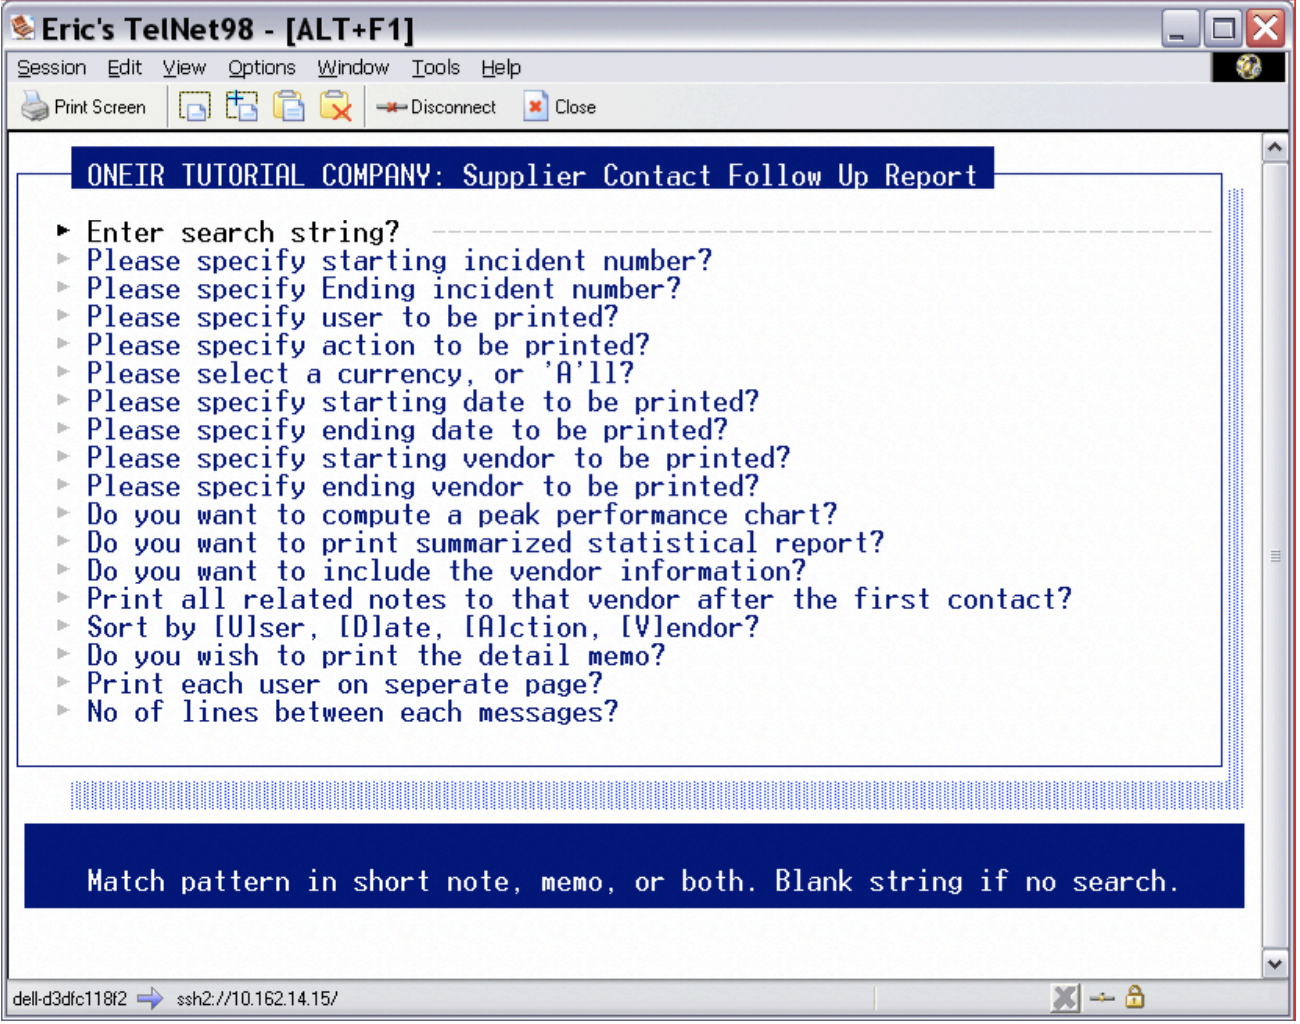
As you can see there are many more options than the F11 contact memo report. In this screen the sales rep code is referred to as ‘user’ as the two are tied together when recording contact notes.
The search string option allows the user to print the report for only items that contain the search string.
You may choose to only print for a certain range of incident numbers. The default will include all incidents numbers.
You may choose to print for one or all users (sales rep codes).
You may choose to print for one or all action codes or use the wild card‘?’ to print for a group of action codes.
You may include Open notes, closed notes or both by choosing all.
You may choose a date range for the report. The default is the current calendar month.
You may choose a range of vendors; the default will always be the first to last vendor.
The peak performance chart is a special report format. It is two reports in one. The first part is a break down of every 15 minutes 8:00 am to 7:00pm with the number of calls in that time period. Each call is represented by a single ‘*’. The second part is a representation of how many minutes were spent on the calls using the same breakdown. The minutes are placed in the fifteen-minute period that the note is recorded in, regardless of the number of minutes the call is logged as. (So there may be more than fifteen minutes reported in a fifteen minute period. Each ‘*‘ in this part of the report represents 7 minutes. This is a special report, so it is always defaulted to no.
A summarized statistical report is another special report. This report will print each customer/vendor that has a note within the reporting range and show the number of notes along with the total number of minutes spent with that customer or vendor. Again, the default answer to this option is no. If you wish to include the vendor code and name on the report, leave the answer as ‘yes’.
If you wish to exclude that information and only see, the date, sales rep, action and the notes, then change the answer to no.
The question “Print all related notes to that vendor after the first contact?” gives the user the option to print the notes after the first one that matches the search criteria. This is especially useful when an incident has multiple notes so the entire history can be reported on at once. However, a normal report will no include all this extra information, so the default is no.
The sorting options are quite straightforward, if you wish to sort the report by one of the options enter the letter corresponding to the option. The default answer is U and will sort by user (sales rep code).
If you only wish to see the short notes, answer ‘No’ to “Do you wish to print the detail memo?” If you wish to include the detail portion of the note, leave the default at Yes.
The last two questions pertain to the presentation of the report. If you are sorting by user (sales rep), you may print each rep on a separate page. This means even if a user (sales rep) only has one note it will print on a separate page. This is useful if the report is being distributed to multiple users (sales reps). The number of lines between notes allows you to put more blank space between the notes on the report. If you do not skip any lines between the notes the report automatically put one line between each entry.
